- doc
- encryption and privacy
- Создание и использование зашифрованных томов LUKS
Introduction to LUKS
The simplest way to carry around the documents that you want to use with Tails encrypted is to use the Persistent Storage.
Для создания зашифрованных томов (например, флешек, внешних жёстких дисков) можно использовать LUKS. Это стандарт шифрования дисков в Linux.
The Disks utility allows you to create encrypted volumes.
The GNOME desktop allows you to open encrypted volumes.
Comparison between LUKS and VeraCrypt
Вы можете открывать в Tails тома, зашифрованные с помощью VeraCrypt. Это шифровальная программа, которая работает в Windows, macOS и Linux. См. наше описание VeraCrypt.
We recommend that you use:
VeraCrypt to share encrypted files across different operating systems.
LUKS to encrypt files for Tails and Linux.
| LUKS | VeraCrypt | |
|---|---|---|
| Compatibility | Linux | Windows + macOS + Linux |
| Create new volumes | Yes | Outside of Tails |
| Open and modify existing volumes | Yes | Yes |
| Encrypted partitions (or entire disks) ¹ | Yes | Yes |
| Encrypted file containers ¹ | Complicated | Easy |
| Plausible deniability ² | No | Yes |
| Ease of use | Easier | More complicated |
| Speed | Faster | Slower |
Правдоподобное отрицание (иногда также легальный отказ): в некоторых случаях (например, при использовании скрытых томов VeraCrypt) злоумышленник не может технически доказать существование зашифрованного тома.
Still, deniable encryption might not protect you if you are forced to reveal the existence of the encrypted volume. See VeraCrypt: Plausible Deniability.
Creating an encrypted partition
Choose Applications ▸ Utilities ▸ Disks to open the Disks utility.
Identifying your external storage device
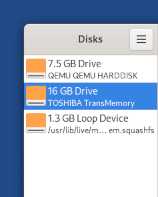
The Disks utility lists all the current storage devices on the left side of the screen.
Подключите внешний носитель данных.
A new device appears in the list of storage devices. Click on it.

Убедитесь, что описание в правой части окна соответствует вашему устройству: модель, объём и т.д.
Formatting the device
Click on the
 button in the title bar and choose
Format Disk to erase all the existing partitions on the device.
button in the title bar and choose
Format Disk to erase all the existing partitions on the device.In the Format Disk dialog:
If you want to overwrite all data on the device, choose Overwrite existing data with zeroes in the Erase menu.
Overwriting existing data does not erase all data on flash memories, such as USB sticks and SSDs (Solid-State Drives).
See the limitations of file deletion.
Choose Compatible with all systems and devices (MBR/DOS) in the Partitioning menu.
Click Format.
In the confirmation dialog, make sure that the device is correct.
Click Format.
Creating a new encrypted partition
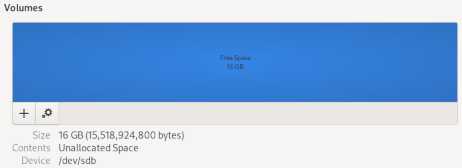
Теперь схема разделов в середине экрана показывает пустое устройство:

Нажмите кнопку , чтобы создать новый раздел на устройстве.
Настройте новый раздел в помощнике по созданию разделов:
В окне Создать раздел:
Размер раздела. Можно создать раздел, занимающий всё устройство или только его часть.
В этом примере мы создадим раздел 4,0 Гб на устройстве 8,1 Гб.
In the Format Volume dialog:
Volume Name
You can give a name to the partition. This name remains invisible until the partition is open but can help you to identify it during use.
Erase
You can choose to overwrite existing data on the partition.
Overwriting existing data does not erase all data on flash memories, such as USB sticks and SSDs (Solid-State Drives).
See the limitations of file deletion.
Type
Choose Internal disk for use with Linux systems only (Ext4) and Password protect volume (LUKS).
В окне Установить пароль:
Пароль. Введите пароль для зашифрованного тома и повторите его для подтверждения.
We recommend choosing a long passphrase made of 5 to 7 random words. Learn about the maths behind memorizable and secure passphrases.
It is impossible to recover your passphrase if you forget it!
To help you remember your passphrase, you can write it on a piece of paper, store it in your wallet for a few days, and destroy it once you know it well.
Затем нажмите Создать.
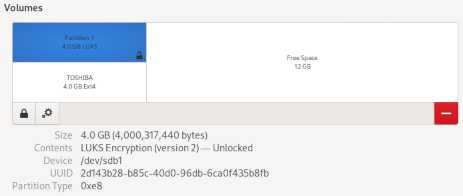
Создание раздела занимает от нескольких секунд до нескольких минут. Примерно так выглядит результат:

Если хотите создать ещё один раздел в свободном пространстве на устройстве, щёлкните по свободному месту, а затем снова нажмите кнопку .
Using the new partition
Новый раздел можно открыть в боковой панели файлового менеджера с той меткой (именем), которую вы ему присвоили.
После открытия раздела с помощью файлового менеджера вы также можете получить к нему доступ из меню .
Opening an existing encrypted partition
When you plug in a device that has an encrypted partition, Tails offers to unlock the encryption automatically.
Plug in the external storage device that has the encrypted partition.
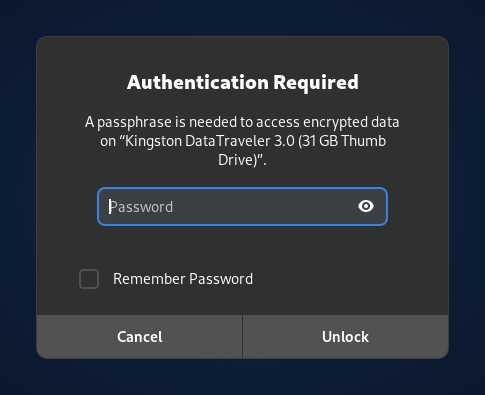
A dialog appears, asking for the passphrase to unlock the partition.

Enter the passphrase of the partition in the password prompt and click Unlock.
If you turn on the option Remember Password, Tails remembers the passphrase of this partition only until you shut down. The passphrase is not stored in your Persistent Storage.
After unlocking, you can access the content of the partition from either:
- The Places menu
- The sidebar of the Files browser
After you finished using the partition, click on the ![]() button next to the partition in the
sidebar of the Files browser to eject the partition safety and lock again the
encryption.
button next to the partition in the
sidebar of the Files browser to eject the partition safety and lock again the
encryption.
Storing sensitive documents
Описанные нами зашифрованные тома не скрыты от чужих глаз. Если злоумышленник получит физический доступ к устройству, он может выяснить, что на устройстве есть зашифрованный том. В определённых ситуациях вас могут заставить сообщить пароль или обманным путем завладеть им.
Opening encrypted volumes from other operating systems
Зашифрованные тома можно открывать и в других операционных системах. Но это может поставить под сомнение защиту, обеспечиваемую Tails.
Например, в другой операционной системе могут быть созданы (и сохранены) значки изображений. Содержимое файлов тоже может быть проиндексировано.
Changing the passphrase of an existing encrypted partition
Choose Applications ▸ Utilities ▸ Disks to open the Disks utility.
Plug in the external storage device that contains the encrypted partition for which you want to change the passphrase.
The device appears in the list of storage devices. Click on it.

Убедитесь, что описание в правой части экрана соответствует вашему устройству: модель, объём и т.д.
Click on the partition displaying a
 in the bottom-right corner.
Click on the
 button and choose Change Passphrase in
the shortcut menu.
